Stay Up To Date
We believe in keeping you in the loop with all the latest happenings in our courses and system. On this page, you'll find a comprehensive log of all the exciting changes, improvements, and additions we make to our courses and system. Whether it's a new feature, a course enhancement, or a system update, we've got you covered. Bookmark this page and check back regularly. We're committed to ensuring that your learning experience remains exceptional and that you have all the information you need to succeed.

New Features

New Updates

Resources & Tools

Important Updates
Here are some of the most recent updates we thought would be helpful to take note of

New Feature: Manual Expiry Date Selection for Certificate Templates
The memberships section offers teaching flexibility, helping you impart knowledge to a wider audience. But, as we all know, that information can become outdated or need refreshing. And what better way to get students to return than adding a clear expiration date to their certificates?
⭐️Why Is This Feature Beneficial To Your Company?
Flexible Expiry: Manually set the expiration date for your templates, ensuring you can manage them efficiently and maintain your timelines at ease.
Simplified Settings: No need to check each sent template to ensure the Expiry date is set correctly; this feature lets you manage all that in a single setting. Keeping temporary and permanent certificates under your control.
Increased Re-engagement: Easily capture students' attention with the integrated expiry reminders, motivating them to refresh their knowledge with your courses.
⭐️How To Manually Add An Expiry Date?
Start by navigating to the Certificates tab inside the Memberships section and clicking the three-dot icon next to your desired certificate.

From the option menu, select “Set Expiry.”

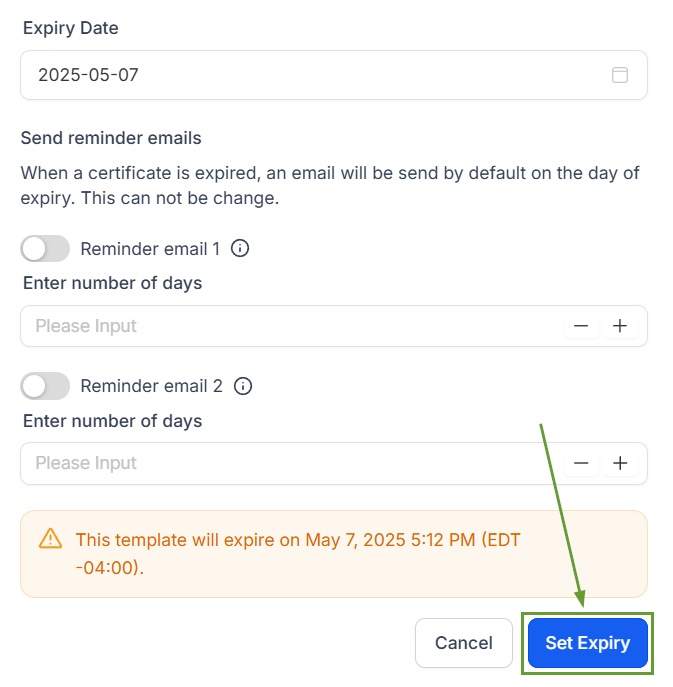
Select the “Set a Date” option to add an expiration or the “Never” option to remove it.

Fill in the other relevant fields, then click the blue Set expiry button.

Once saved, your expiry date will be applied every time you use the template. Still, allowing for change before sending, granting even more personalization. Helping you keep students happy while still motivating them to come back!
